Register your account
You can register by following the steps below:
- Access the Bangkok Bank API Developer Portal through your browser

- Select the "Register" buttonOn the homepage, click on the "Register" button located at the top right corner of the screen.
- Fill in your information to create an account

- Confirm and submit the informationReview the information you have entered to ensure it is complete and accurate, then click the "Create New Account" button to submit the information.
Create an app to test API
- Select the main menu

- Select "My Account" then choose "My Apps".

- Click the "Add Application" button
- Fill in the information to create a new application. For example:
- Application Name: Enter the desired name for the application.
- API Product: Select the desired API product to register, such as:
- AppToApp
- Smart Bill Payment
- Thai QR Payment
- Thai QR Refund
- Thai QR Validation
- Description: Enter the description of the app

- Once all details are filled in, click "Save" to create the application.

Test API via API Explorer
You can use API Explorer from each API product’s page to try out sandbox API.

Test API via Postman
If you wish to test out sandbox APIs using Postman, download the collections below.
For more information on how to import collection using postman, please refer to the guide Import an API to Postman
Digital Signature JWT Guide
Digital Signature JWT Specification
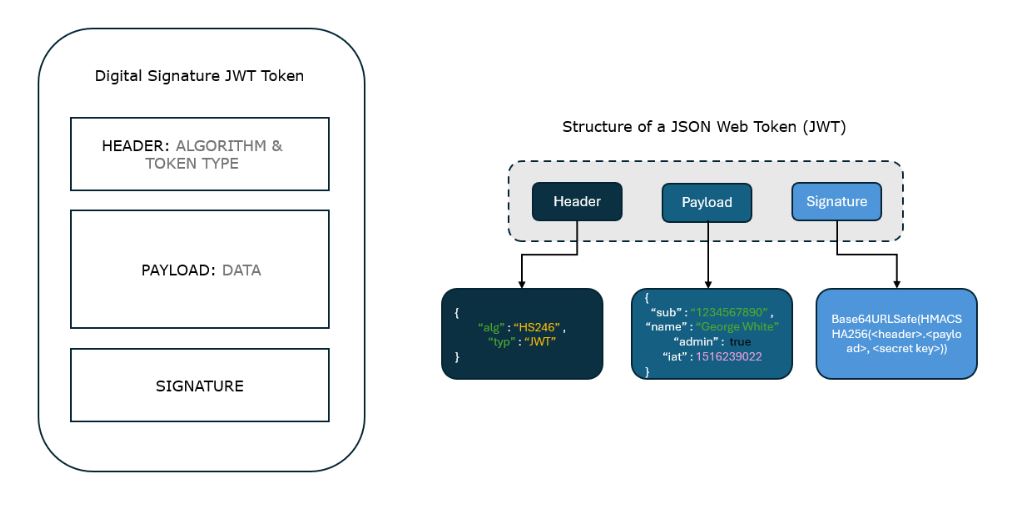
JSON Web Tokens (JWTs) consist of three main components: the Token Header, the Token Payload, and the Signature. These components work together to encode information securely for transmission between parties.
Header
The Token Header provides information about how the JWT is signed. It typically consists of two parts: the type of the token, which is JWT, and the signing algorithm being used, which is specified in the "alg" field.
| Claim | Description | Value |
|---|---|---|
| typ (Token Type) | Indicates the type of the token. For JWT, it is set to "JWT." | JWT |
| alg (Algorithm) | Specifies the algorithm used for signing the token. BANGKOK BANK employs the RS256 algorithm, which is a widely used and secure asymmetric algorithm. | RS256 |
Payload
The Token Payload contains claims. Claims are statements about an entity and additional data. BANGKOK BANK uses specific claims to convey information about the API request.
| Claim | Description | Example |
|---|---|---|
| body (Custom Data) | Data to embedded as part of the payload Contains JSON data JWT creator want to encode as part of the Payload. | |
| iat (Issued At) | Time to create token (timestamp) The "iat" claim indicates the timestamp at which the token was issued. | 1655967073(Represents the timestamp when the token is created. For details, specification, please refer to Unix Time in the glossary section) |
| exp (Expiration Time) | Now + 1 Day (timestamp) The "exp" claim defines the expiration time for the token. It is a timestamp indicating when the token should be considered invalid. | 1655995873(Represents a timestamp one day in the future. For details, specification, please refer to Unix Time in the glossary section) |
| jti (JWT ID) | UUID The "jti" claim provides a unique identifier for the JWT. | ba7544f4-a7c5-4362-8009-51f1ab25e132(a UUID serving as the JWT ID) |
Payload Example:
{
  "exp": 1655995873,
  "iat": 1655967073,
  "jti": "ba7544f4-a7c5-4362-8009-51f1ab25e132",
  "transType": "APP2APP",
  "serviceCode": "PVT4CCM",
  "billerId": "010753600037451",
  "reference1": "1234567890123",
  "totalAmount": 100.00,
  "shopName": "shopNameApigee",
  "osPlatform": "ANDROID",
  "currencyCode": "THB",
  "shippingFee": 0.00,
  "additionalInfo": [
    {
      "name": "test",
      "value": "partner"
    }
  ],
  "partnerAppUrl": "app2app://BANGKOK BANKpartner.app/result"
}
Signature
The Signature is a crucial part of the JWT structure. It is created by combining the encoded Token Header, encoded Token Payload, and a secret key. The resulting signature is used to verify the authenticity of the JWT.
Glossary of Terms
This section provides a glossary of key terms used throughout this API specification document. Understanding these terms is crucial for effective implementation and integration of JWTs within the BANGKOK BANK API framework. The glossary is presented in a table format for clarity and quick reference, delineating each term and its specific context or definition as it applies to JWT and API interactions.
| Terms | Definition |
|---|---|
| JWT (JSON Web Token) | A compact, self-contained method for securely transmitting information as a JSON object between parties. This information can be digitally signed and verified for authenticity and integrity. |
| Header (JWT Header) | The first part of a JWT, indicating the token's type (JWT) and the algorithm used for signing (e.g., RS256). |
| Payload (JWT Payload) | The second part of a JWT, containing the claims, which are statements about an entity (like a user) and additional data. It includes both standard and custom claims. |
| Signature (JWT Signature) | The third part of a JWT, created by encoding the header and payload and then signing it with a secret key and algorithm. This signature ensures the JWT's authenticity and integrity. |
| Claims (JWT Claims) | Statements within the JWT payload about an entity and additional metadata. They include standard claims (like exp, iat, jti) and custom claims tailored to specific application needs. |
| Standard Claims (JWT Standard Claims) | Predefined claim names in a JWT payload, offering a set of useful, interoperable claims. Examples include exp (expiration time), iat (issued at), and jti (JWT ID). |
| Custom Claims (JWT Custom Claims) | Custom-defined claims within the JWT payload, intended for conveying application-specific information or metadata. |
| API Request Payload | The data sent in an API request, formatted in JSON. It includes any necessary information for the API's processing and may also contain a JWT for authentication purposes. |
| JSON Data | JavaScript Object Notation (JSON), a lightweight and language-independent data format used for representing structured data. Commonly used in API communication and as a format for JWT. |
| Unix Time | Unix time is a date and time representation widely used in computing. It measures time by the number of seconds that have elapsed since 00:00:00 UTC on 1 January 1970, the Unix epoch. For example: The Unix time for January 1, 2024, at 00:00:00 UTC is 1704067200. |
Usage in Sandbox
To generate the JWT signature for Sandbox, Our Developer portal has provided you with the utility API to easily construct a JWT signature based on the payload you are utilizing for the API calls.
Construct a POST request to our https://api-sandbox.bangkokbank.com/v1/jwt/partner endpoint.
Here's an example of the request:
curl --location "https://api-sandbox.bangkokbank.com/jwt/partner" \
--header "Content-Type: application/json" \
--header "Authorization: Bearer {{access-token}}" \
--data "{
  \"transType\": \"APP2APP\",
  \"serviceCode\": \"BBLSANDBOX\",
  \"billerId\": \"111222333456789\",
  \"reference1\": \"12345\",
  \"reference2\": \"12345678\",
  \"shippingFee\": 300.01,
  \"totalAmount\": 250111111.01,
  \"shopName\": \"shopNameTest\",
  \"shopImage\": \"UE5HDQoaCgAAAA1JSERSAAAAGAAAABgIBAAAAEp+cwAAAARnQU1BAAALYQUAAAAgY0hSTQAAeiYAAAAAAAAAAAB1MAAAYAAAOgAAF3BRPAAAAAJiS0dEAAAjMgAAAAlwSFlzAAAOAAAOASsOGwAAAAd0SU1FBwQTBTAHAAABPklEQVQ4L0xbU\",
  \"osPlatform\": \"ANDROID\",
  \"currencyCode\": \"THB\",
  \"partnerAppUrl\": \"com.bangkokbank.mobilepartnersandbox://payment\",
  \"buyerName\": \"TestBuyerName\",
}"
Ensure you replace {{access-token}} with your actual API token obtained from your Application credentials. The request body contains the payload for which you want to generate the JWT signature. Customize the payload according to your requests.
Upon successful API request, you will receive a response containing the generated JWT signature. Use this JWT signature in the appropriate headers or authentication mechanisms for subsequent API requests on our platform. The JWT signature acts as proof of authentication and authorization.
Usage in Production
Generating Private and Public Keys
- Generate a Private Key (Used for signing digital signatures)Run bash command:
openssl genrsa -aes256 -out private_key.pem 2048Example:-----BEGIN RSA PRIVATE KEY----- MIIEowIBAAKCAQEAt1QfiA4ZH+HQ2RB03seKDSh8/2XeVNN/7IBzlcM7tAD2f+NY... -----END RSA PRIVATE KEY----- - Generate a Public Key (Used for validating digital signatures)Run bash command:
openssl rsa -pubout -in private_key.pem -out public_key.pemExample:-----BEGIN PUBLIC KEY----- MIIBIjANBgkqhkiG9w0BAQEFAAOCAQ8AMIIBCgKCAQEAt1QfiA4ZH+HQ2RB03seK... -----END PUBLIC KEY-----
Generating the JWT
To generate the JWT, prepare the private key and payload, then use the following example code.
Code Example in NodeJS:
const jwt = require('jsonwebtoken');
const fs = require('fs');

const privateKey = fs.readFileSync('private_key.pem', 'utf8');

const payload = {
    "transType": "APP2APP",
    "serviceCode": "PVT4CCM",
    "billerId": "010753600037451",
    "reference1": "1234567890123",
    "totalAmount": 100.00,
    "shopName": "shopNameApigee",
    "osPlatform": "ANDROID",
    "currencyCode": "THB",
    "shippingFee": 0.00,
    "additionalInfo": [ { "name": "test", "value": "partner" } ],
    "partnerAppUrl": "app2app://BANGKOK BANKpartner.app/result"
}

const token = jwt.sign(payload, privateKey, { algorithm: 'RS256', expiresIn: '1d', jwtid: "ba7544f4-a7c5-4362-8009-51f1ab25e132" });

console.log(token);
Verifying the JWT
In certain scenarios, BANGKOK BANK may require merchants to verify the JWT sent from the Bangkok Bank API Gateway. Merchants are expected to verify the token using the provided BANGKOK BANK public key to ensure the validity of the request.
Please refer to jsonwebtoken for the usage of the library.
Code Example in NodeJS:
const jwt = require('jsonwebtoken');
const fs = require('fs');

const publicKey = fs.readFileSync('public_key.pem', 'utf8');

// Replace with the received token
const token = 'recieved-token';

jwt.verify(token, publicKey, { algorithms: ['RS256'] }, (err, decoded) => {
    if (err) {
        console.error('Token verification failed:', err.message);
    } else {
        console.log('Token verified:', decoded);
    }
});